
Viego Jungle Guide — Solo/Duo
Clear with a plan. Buy for the next fight. Find the first reset before committing to the rest.
Published by Ahmed Kanash (ZeusRa) · Build and mechanics update: October 9, 2026.
- Patch context
- 26.19
- Last Reviewed
- Environment
- Ranked Solo/Duo
Build your own opening.
Clear cleanly. Hit your spike. Punish the mistake. Viego carries by turning the first takedown into a reset chain.
Ask who can actually die? Flashless carry, exposed support or low frontliner — take the available reset. You do not need the last hit.
Enter second when possible. Check allied range and enemy CC; walking first into five healthy champions is usually a throw.
Hail of Blades or Conqueror?
Hail of Blades · burst into a reset
Fast AA weave, quick Q-mark procs, short first-kill window. Good into reachable squishies and isolated targets.
Crit or lethality can fit. HoB’s opening ends; it is not automatically better in a long front-to-back.
Conqueror · stay in the skirmish
Repeated AA and spells into durable targets. Better when allied engage gives you time to stay on someone.
Cash Back + Cosmic Insight is the secondary here. Damage or bruiser both work; buy for your uptime.
Runes · patch 26.19
Select a rune to change this preview and inspect its effect. One per primary row; two from different secondary rows.
 Domination
 Precision
Fast opening autos. Cash in your marks before the target gets away.
Conqueror starts with Cash Back + Cosmic Insight. Boots stay available whenever your game needs them.
HoB for a short burst window. Conqueror for sustained contact. Neither wins every draft.
Scaling health is the default defensive shard; swap to health or tenacity and slow resistance when needed.
Core first. Adapt the next slot.
Kraken → Shieldbow is the main carry route. Kraken → LDR if you need armor pen immediately. Trinity → Sundered Sky is the bruiser core.
Main carry build
 Kraken Slayer
 Immortal Shieldbow
No immediate armor pen needed. Get your DPS spike, then survive the burst.
Armor first
- Kraken Slayer
 Lord Dominik’s Regards
Armor is already online. Bring pen forward; Shieldbow can be third.
Bruiser core
 Trinity Force
 Sundered Sky
Spellblade weaving and sustained contact. A strong route when you need more staying power.
Solo/Duo build variations
Six slots · adapt after core
Standard carry · no early armor
- Kraken Slayer
 Plated Steelcaps
- Immortal Shieldbow
- Lord Dominik’s Regards
 Infinity Edge
 Guardian Angel
Kraken → Shieldbow first. Add LDR when armor arrives; IE only with safe crit uptime.
Armor appears early
- Kraken Slayer
- Plated Steelcaps
- Lord Dominik’s Regards
- Immortal Shieldbow
 Death’s Dance
- Guardian Angel
Kraken → LDR first. Shieldbow next; DD and GA keep the reset window playable.
Bruiser · extended fights
- Trinity Force
- Plated Steelcaps
- Sundered Sky
 Black Cleaver
- Death’s Dance
- Guardian Angel
Trinity → Sundered Sky. Cleaver for repeated contact, then armor and shutdown protection.
AP pressure
- Kraken Slayer
 Mercury’s Treads
 Maw of Malmortius
 Wit’s End
- Lord Dominik’s Regards
- Guardian Angel
Maw replaces Shieldbow. Wit’s End for MR and sustained autos; LDR if armor matters.
Squishy targets · burst window
- Kraken Slayer
- Mercury’s Treads
- Immortal Shieldbow
 Voltaic Cyclosword
- Lord Dominik’s Regards
- Guardian Angel
Voltaic fits a short catch into low armor. Swap it for defense if you die before the reset.
Shields deny kills
- Kraken Slayer
- Plated Steelcaps
- Immortal Shieldbow
- Lord Dominik’s Regards
 Serpent’s Fang
- Guardian Angel
Serpent’s Fang in the fourth legendary slot when shields keep saving your target.
Examples, not shopping scripts. Boots can come earlier; swap the last slots for the next fight.
Very situational · Bastionbreaker into Collector
Greedy snowball only
 Bastionbreaker
- Plated Steelcaps
 The Collector
- Lord Dominik’s Regards
- Infinity Edge
- Guardian Angel
A greedy low-armor snowball. Choose this only when easy kills and safe target access are already there.
Core Options
Compare options
Two real identities. Buy for your next fight.
Kraken Slayer
Main carry start: clear speed and repeated-hit DPS. Pair with Shieldbow unless armor demands early LDR.
Trinity Force
Strong bruiser start. Weave spells and AA for Spellblade; health and move speed help you stay in range.
Burst Options
Compare options
For targets you can catch and kill before the fight stretches.
Immortal Shieldbow
Preferred second item after Kraken when you do not need pen yet. Crit plus Lifeline against burst.
Voltaic Cyclosword
Short burst into low armor. Its current Energized proc adds damage and temporary lethality; do not build for an old slow.
Infinity Edge
Later crit payoff. Buy when your crit setup and target access justify another damage slot.
Anti-Armor Options
Compare options
Armor showing? Bring pen forward.
Lord Dominik’s Regards
Kraken → LDR when armor is already cutting your damage. Shieldbow can follow.

Mortal Reminder
Use this pen branch when you also need anti-heal. Do not stack it with LDR or Cleaver.
Black Cleaver
Bruiser pen through repeated physical hits. Useful when allied AD benefits from your shred.
Defensive Options
Compare options
Survive the first kill. Then play the reset.
Death’s Dance
Into physical pressure when a takedown is realistic. Great for staying in a fight you can finish.
Guardian Angel
Protect a shutdown when your team can hold the revive spot. Do not revive alone in five enemies.
Maw of Malmortius
AP burst stops your entry? Take Maw instead of Shieldbow; their Lifeline group is exclusive.
Wit’s End
MR, attack speed and tenacity for repeated autos. Better sustained contact; Maw answers magic burst.
Bruiser Options
Compare options
Trinity → Sundered Sky is the core. Add the defense the lobby needs.
Sundered Sky
Health and first-hit sustain for extended skirmishes. Follow Trinity when you need to keep fighting.

Eclipse
Situational damage-and-shield trade pattern. Reassess if you need actual armor or MR.
Snowball Options
Compare options
Collector is not a standard Viego purchase here.

Hubris
High-risk takedown stacking. Only commit when you can convert the lead without donating your shutdown.
Bastionbreaker
Very situational lethality commitment. Snowball through easy takedowns and convert into objective pressure.
The Collector
Skip it in normal builds. The narrow exception is Bastionbreaker → Collector into easy, low-armor kills; it gives up safer carry or bruiser spikes.
Serpent’s Fang
Shield-heavy lobby only. Usually a fourth legendary option; buy earlier only if shields are already blocking every reset.
Situational Boots
Compare options
Do not lock boots before reading the enemy damage and CC.
Plated Steelcaps
Heavy basic-attack pressure. Read the whole comp, not just their jungler.
Mercury’s Treads
MR plus tenacity into reducible CC. They do not shorten knockups or suppression.

Berserker’s Greaves
More AA uptime when you can afford to give up defensive boots.
Choose one Lifeline item: Maw of Malmortius or Immortal Shieldbow. Also choose one penetration branch: Black Cleaver, Lord Dominik’s Regards, or Mortal Reminder. Each group has a one-item shop restriction.
Red, blue or green?

Red · Scorchclaw Pup
My Solo/Duo lean for committed fights: burn plus a slow helps secure the first kill. Slowing their chase can help you get out; red does not grant move speed.

Blue · Gustwalker Hatchling
Brush and large-monster move speed for tempo, rotations and target access. Strong when getting to the play is harder than finishing it.

Green · Mosstomper Seedling
A refreshable shield, not bonus maximum HP. In my Viego builds, green is the weakest default: I would usually rather have red’s damage and slow or blue’s movement speed. The shield can still be useful when it is what lets you survive the entry.
These are fully evolved pet effects. Red is situational, not a universal winner; choose before the game for your fight plan.
Earn the first decision.
Default full clear. Finish toward the lane with setup; adjust for invade threat and who can cover your start.
Keep the clear healthy
Ability → AA to proc marks. Kite toward the next camp without resetting it. Check waves, HP, summoners and allied CC between camps.
Change the route for a real play
Break tempo for a reliable gank, countergank or invade. Flashless target plus allied CC is a window; full HP with no setup is a hope.
Protect camps and track the enemy
Ward the vulnerable entrance or ask for cover. Track sightings and camp information; do not treat a guessed start as fact.
River and first recall
No lane prio? Give the bad Scuttle contest. Recall for useful components and line up your next camps; buy early boots for actual access or defense.
Example routes, not a locked red start. No untested clear timestamps.
Six camps by default. Three when a lane is open.
ZeusRa’s usual plan is a six-camp clear in roughly nine games out of ten. Leave after Raptors only when a nearby laner needs a gank and the wave, health, and vision make it realistic.
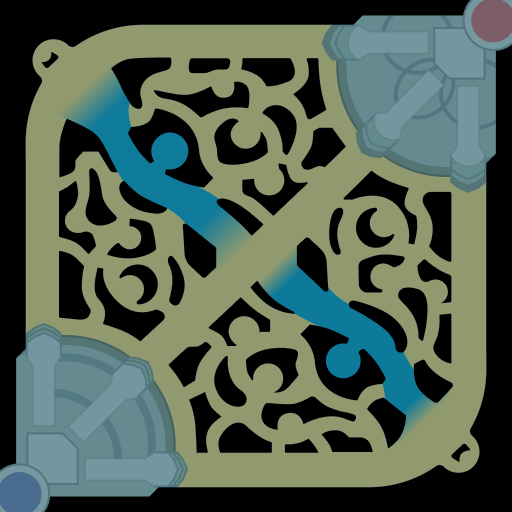
Default: full clear
- Red Buff — start Q and weave attacks between abilities.
- Krugs — take W at level 2 and kite toward Raptors.
- Raptors — at level 3, decide whether the gank is actually available.
- Wolves → Blue → Gromp — take a second Q point at level 3, then E at level 4. Check Scuttle and nearby lanes after the clear.
- If a lane becomes urgent, adapt instead of walking past a clear play.
Turquoise = blue team; crimson = red team. “Golems” is the older name for Krugs. Camp dots and arrows are a planning overlay on Riot’s simplified map, not exact in-client coordinates.
Tempo before noise.
- Farm or gank: no real setup, finish camps. Strong window closing, move now.
- Cross-map: enemy shows opposite side? Take a safe camp, gank or objective with prio.
- Protect camps: ward, ping the collapse, trade sides if you cannot defend. Do not die over one camp.
- Before objectives: lane prio, enemy jungler, HP and Smite. Starting can give away your position.
- Skip the coin flip: keep the clear that gets you to your spike.
Bot behind, mid pushed in or resetting? You can trade Dragon for Grubs if their jungle commits bot and top can cover. A TP advantage helps the numbers; check top’s wave, entrances and Smite first. No safe cover means give and farm.
Turn one mistake into a sequence.
- Cycle camps between plays. Recall and spend before the objective fight.
- Use fog and E for angles. Enemies see the mist; camouflage is not permission to facecheck.
- Track the CC or escape that blocks entry. When it is down, hit the easiest first-reset target.
- After a kill: chain the body, take objective, steal camps or reset. Do not chase away the value.
Patience protects the reset.
Wait for allied contact and key enemy CC. Target access matters more than six finished items.
Plan a first target and a fallback. Take a body only when you can reach it safely; keep R for a useful landing or escape.
No reset window? Stay alive. You can convert a teammate’s kill without starting the fight yourself.
Clean inputs. Clear purpose.
Standard mark weave

- Basic attack

- Basic attack
Each damaging spell marks; the next AA procs it. Let each auto land.
Short HoB entry
- Basic attack
- Basic attack
Keep hitting while the target is in range. Hold Heartbreaker for the finish or reposition.
Mark into execute
Tag first. R can consume the mark on its primary target — the lowest-percentage-health champion in the landing area. Make sure it is the target you marked.
Consume the mark
- Basic attack
Consume the mark before the next damaging spell for a clean weave. Spreading marks only helps if you can hit those targets.
Charge from fog
Charge unseen, avoid blockers, release in follow-up range. E’s visible mist still gives them information.
Finish or escape
Aim for the right primary target and landing. Defensive R is valid. Displacement resistance during the cast is not a cleanse; CC can remain after landing.
Use the body, then exit

- Borrowed spells
- Basic attack

Borrowed damaging spells mark too. Weave AA where safe, use the best tool and R out when the initial lockout ends. No borrowed enemy ultimate.
Practice the AA weave and target selection. No undocumented animation-cancel claims.
Judge the body, not its name.
Borrow tools, not a champion tier. Check CC, mobility, damage and your next R landing.
What stays yours
- Your runes, summoners and trinket.
- Heartbreaker replaces the borrowed ultimate.
- Borrowed damaging abilities apply Q marks. Consume them with AA; non-damaging spells do not mark.
What changes
- You inherit basic abilities, AA, items and stats. Your own build is not added on top.
- Item actives and consumables are unavailable. Item passive cooldowns are shared across possessions.
- Check the new spell bar and position. Use the best tool, then reassess.
Stay or R out?
- CC: can a basic spell lock the next target?
- Mobility / defense: does the body improve your position or keep you alive?
- Damage: do its spells and items finish someone now?
- Cooldowns: a good spell you cannot cast is no reason to stay.
- Exit: are you delaying a better R or landing in enemy CC?
A tool and a safe next step
Immediate CC, mobility or defense creates the next kill from a good position.
Useful follow-up
A damage rotation or protective spell helps finish a reachable target. Use it, then exit.
The fight decides
A fed carry body is good with space and bad inside layered CC. Items and position decide.
No useful tool remains
Unsafe body, empty cooldowns or better R access? Take the heal and leave when allowed.
A support’s instant CC can beat a fed carry body you cannot safely use. A tank can buy space; staying for low DPS can waste the chain.
R hits the lowest-percentage-health champion in its landing area. R cannot be cast while rooted. Its cast resists displacement; it is not a cleanse or blanket CC immunity. CC that lands during the cast can still affect you after landing, including Warwick’s suppression if it remains active.
Jungle matchup plans.
Green: punishable with setup. Yellow: respect the fight. Red: high threat. These are ZeusRa’s play plans, not win-rate tiers.
These are practical threat assessments, not statistical counter tiers. Search a champion or a problem, then open its plan.
20 of 20 matchup plans
Lee Sin
High threat
- Difficulty
- Demanding early; easier to punish after a missed entry.
- Early invade threat
- High when his nearby lanes can move. Protect the entrance he can reach with help.
- 1v1 threat
- Respect his early burst and chase. Look for a health or level advantage and nearby backup.
- Scaling comparison
- Later fights revolve around his displacement versus your reset access, rather than a guaranteed duel win.
- Important cooldown
- Sonic Wave for entry; Dragon’s Rage after level six.
- Pathing note
- Do not follow a missed Q into unseen teammates. Trade sides when your lanes cannot defend an invade.
- Teamfight note
- Watch his kick angle: he can remove you from the reset target or send you into his team.
- Possession value
- Mobility and a basic slow can help follow the next target. You do not receive his kick.
- Rune / build adaptation
- Conqueror for a controlled longer skirmish; HoB for allied catch and a brief punish window. Buy defense for the full enemy damage profile.
Graves
High threat
- Difficulty
- Demanding when he invades with priority and maintains spacing.
- Early invade threat
- High when lanes let him move through your jungle safely.
- 1v1 threat
- Ranged attacks, armor access, and spacing make blind melee pursuit costly.
- Scaling comparison
- Expect sustained ranged damage later. Your advantage depends on contact and resets.
- Important cooldown
- Quickdraw for spacing; Smoke Screen for vision and target access.
- Pathing note
- Defend entrances with information and lane help. Trade opposite camps when you cannot contest.
- Teamfight note
- Avoid entering through Smoke Screen into an unknown enemy formation.
- Possession value
- A dash and ranged damage are valuable when his build is strong and you have room to fire.
- Rune / build adaptation
- Prioritize access and the armor he has actually bought. Conqueror suits longer contact; armor can be more useful than further lethality when physical damage stops your entry.
Kindred
High threat
- Difficulty
- Demanding when mark pressure comes with lane priority.
- Early invade threat
- High around a marked camp they can contest with nearby allies.
- 1v1 threat
- Ranged kiting and repeated short dashes punish a straight-line approach.
- Scaling comparison
- Their range and carry damage become important. Deny safe access rather than assuming you outscale them.
- Important cooldown
- Dance of Arrows for spacing; Lamb’s Respite after level six.
- Pathing note
- Marks are information, not orders to fight. Defending one without lane movement can lose both camp and life.
- Teamfight note
- Do not spend all damage or R into Lamb’s Respite before its protection ends.
- Possession value
- A ranged damage body with mobility when equipped. You do not gain Lamb’s Respite.
- Rune / build adaptation
- HoB can fit allied catch and a short kill window; Conqueror fits extended contact. Answer the rest of the composition with your defensive purchases too.
Warwick
Respect the matchup
- Difficulty
- Especially dangerous in low-health, extended early duels.
- Early invade threat
- Respect him when your clear leaves you vulnerable or lanes cannot help.
- 1v1 threat
- High threat when you offer repeated melee attacks while injured.
- Scaling comparison
- His control stays relevant. Do not treat him as harmless after your first item.
- Important cooldown
- Primal Howl; Infinite Duress after level six.
- Pathing note
- Keep a healthy clear. Do not stay for one more camp when his invade is already visible.
- Teamfight note
- Follow allied control and avoid being caught before the first takedown.
- Possession value
- A basic fear and damage reduction can create space. His ultimate is not available.
- Rune / build adaptation
- Burst does not automatically beat sustain. Conqueror pays only when the extended fight is one you can win; allied damage and justified anti-heal beat taking the duel alone.
Lillia
Respect the matchup
- Difficulty
- Difficult when she keeps distance and turns a chase into repeated poke.
- Early invade threat
- Watch camp pressure when her lanes can move first.
- 1v1 threat
- Depends strongly on landing control before she creates space.
- Scaling comparison
- Movement and team-wide sleep threaten later fights. Target access must be disciplined.
- Important cooldown
- Blooming Blows for spacing; Lilting Lullaby after level six.
- Pathing note
- Arrive from fog or with allied setup. Do not follow her through several unwarded camps.
- Teamfight note
- Avoid an easy sleep setup. Find a reachable target rather than forcing Lillia herself.
- Possession value
- Movement and basic-area damage can help reposition. You do not receive her sleep ultimate.
- Rune / build adaptation
- HoB can reward a caught Lillia; Conqueror matters only if contact lasts. MR and appropriate tenacity can answer the broader magic/control threat.
Kha’Zix
Respect the matchup
- Difficulty
- Dangerous in isolation; more manageable with nearby teammates.
- Early invade threat
- Respect fog and isolation on exposed camps.
- 1v1 threat
- High threat when he gets isolated burst and a clean exit.
- Scaling comparison
- His pick threat remains meaningful. A grouped reset fight differs from a lonely jungle duel.
- Important cooldown
- Leap; track his escape access before pursuing.
- Pathing note
- Ward the entrances you must use. Coordinate a collapse instead of facechecking alone.
- Teamfight note
- Protect your entry from a flank. Avoid splitting away from help just to chase a body.
- Possession value
- Basic burst and mobility can help the next kill; check the spells available in the borrowed body.
- Rune / build adaptation
- HoB fits a caught-target punish; Conqueror suits team-backed extended combat. Armor and durability help when his first burst prevents any reset.
Nocturne
Respect the matchup
- Difficulty
- Changes sharply once his ultimate can threaten lanes.
- Early invade threat
- Do not assume a farm plan means he cannot contest your jungle.
- 1v1 threat
- Spell shield and fear can punish a predictable W entry.
- Scaling comparison
- His side-lane access and engage remain threats. Your reset plan needs to survive the first contact.
- Important cooldown
- Shroud of Darkness; Paranoia after level six.
- Pathing note
- Track where he can finish the clear. Warn the exposed lane before the ultimate threat becomes a kill.
- Teamfight note
- Avoid an isolated chase when darkness cuts your team’s information.
- Possession value
- Spell shield and fear can help the follow-up. His global ultimate is not yours.
- Rune / build adaptation
- Conqueror can support longer fighting with protection. Do not buy only burst if his entry and follow-up consistently kill you first.
Amumu
Respect the matchup
- Difficulty
- The main danger is layered teamfight control, not just the duel.
- Early invade threat
- Less threatening alone than some duelists, but lane collapses can still turn your invade against you.
- 1v1 threat
- Depends on levels, health, and his build. A tank label does not mean zero damage.
- Scaling comparison
- Multi-target engage keeps value as teams group. Survive it or enter after it.
- Important cooldown
- Bandage Toss and Curse of the Sad Mummy.
- Pathing note
- Punish a visible route with safe farm or lane pressure. Check which lanes can respond before invading.
- Teamfight note
- Spread before his engage. Wait for a control window instead of standing beside your entire team.
- Possession value
- Bandage Toss and basic-area damage can support follow-up. His ultimate is not available.
- Rune / build adaptation
- Conqueror and sustained damage fit durable fights. Add armor penetration or durability for the actual threats; tenacity does not make every part of his engage harmless.
Shyvana
Respect the matchup
- Difficulty
- Yellow: respect her farm tempo and escape tools.
- Early invade threat
- Check lane prio before contesting. Do not assume her farm lead gives you a free invade.
- 1v1 threat
- Fight on a real spike or with setup. Matching a level or item lead head-on is not the plan.
- Scaling comparison
- Expect Shyvana to farm faster and often reach a level or item advantage first. Her build changes the later fight.
- Important cooldown
- W speed and shield, E slow, R flight over walls.
- Pathing note
- Keep your clear efficient; do not try to recover a farm deficit by chasing her. W can create space, E can slow your pursuit and R can carry her over a wall. Cross-map a visible play.
- Teamfight note
- Do not burn everything chasing her exit. Hit the easiest reset target with your team.
- Possession value
- Basic damage, E slow and W speed can help the next kill. You do not gain her R flight.
- Rune / build adaptation
- Conqueror with sustained contact; HoB with reliable catch. Buy for her damage profile and actual armor.
Briar
Respect the matchup
- Difficulty
- Yellow: punishable commitment, dangerous sustain.
- Early invade threat
- Keep a healthy clear and cover exposed entrances. Low HP invites a bad duel.
- 1v1 threat
- Respect frenzy and E damage reduction. Use W and allied damage when she commits.
- Scaling comparison
- Her dive can create your reset or kill you first. Position with help.
- Important cooldown
- E damage reduction and knockback; R engage after six.
- Pathing note
- Countergank a committed dive. Do not chase through fog after her defensive E.
- Teamfight note
- Let her commit, then focus her with your team. Stay out of a wall-stun setup.
- Possession value
- Basic CC and defense can buy the next window. Frenzy can also ruin your position.
- Rune / build adaptation
- Pick by fight length. Add anti-heal when needed; do not expect HoB alone to beat sustain.
Master Yi
Favorable with setup
- Difficulty
- Green with CC setup; not a free late-game duel.
- Early invade threat
- Pressure with prio and information. Do not donate a solo kill over one camp.
- 1v1 threat
- Hold W for his Q exit. Do not dump your burst into Meditate.
- Scaling comparison
- He scales hard with uninterrupted autos. Shut down access rather than racing his DPS.
- Important cooldown
- Q untargetability and W Meditate.
- Pathing note
- Punish weak lane setup or a visible route. Secure your camps and item tempo.
- Teamfight note
- Chain allied CC after Q. A caught Yi is a reset; a free-hitting Yi is a problem.
- Possession value
- Q can dodge and follow; W can buy time. You do not borrow Highlander.
- Rune / build adaptation
- HoB to punish catch; Conqueror for supported contact. Never read green as permission to ignore items or levels.
Nunu & Willump
Favorable with setup
- Difficulty
- Green when you track his ganks and deny easy snowball entries.
- Early invade threat
- Respect lane collapses and his Q sustain. Do not contest Smite range blindly.
- 1v1 threat
- Use W and spacing to interrupt his plan. Account for his current tank or AP build.
- Scaling comparison
- His engage and objective secure stay useful; your carry threat needs farm and resets.
- Important cooldown
- W snowball, Q Consume and R channel.
- Pathing note
- Ward likely gank routes and punish his visible plays across the map.
- Teamfight note
- Avoid the snowball entrance; save an interrupt for R when safe.
- Possession value
- Q sustain and basic CC help follow-up. You do not gain Absolute Zero.
- Rune / build adaptation
- Conqueror for tank contact; HoB for a caught squishy build. Bring pen when armor appears.
Xin Zhao
Respect the matchup
- Difficulty
- Yellow: strong early contact; punish the spent engage.
- Early invade threat
- High with lane prio. Cover the entrance rather than matching an unsupported invade.
- 1v1 threat
- Respect his third-hit sustain and Q knockup. Fight with an HP, level or teammate advantage.
- Scaling comparison
- Your reset chain can win grouped fights; his peel and R still matter.
- Important cooldown
- E entry, Q knockup and R zone after six.
- Pathing note
- Keep camp tempo and track his early gank side. Do not follow him into lane help.
- Teamfight note
- Hit a reachable target together. His R can separate your follow-up from allied damage.
- Possession value
- Q knockup and E gap close help chain a kill. You do not gain Crescent Guard.
- Rune / build adaptation
- Conqueror for supported melee uptime; HoB for a catch after his entry. Shieldbow helps only if you survive to use the damage.
Jarvan IV
Favorable with setup
- Difficulty
- Green after E–Q is spent; his first gank is still dangerous.
- Early invade threat
- Respect early lane collapses. A missed combo alone does not reveal his teammates.
- 1v1 threat
- Sidestep E–Q and punish the cooldown. Account for his opening passive hit.
- Scaling comparison
- Your resets can take over; his engage stays useful even from behind.
- Important cooldown
- E–Q knockup and R terrain after six.
- Pathing note
- Track early gank routes and take safe camps when he shows. Do not lose tempo chasing.
- Teamfight note
- Avoid clumping for his engage. Keep an exit from Cataclysm and follow your team’s damage.
- Possession value
- E–Q gives a knockup and reposition; W adds a shield. You do not gain Cataclysm.
- Rune / build adaptation
- HoB punishes a caught Jarvan; Conqueror fits bruiser contact. Kraken → LDR only when his armor warrants pen.
Vi
Respect the matchup
- Difficulty
- Yellow: punish a missed Q, respect her post-six lockdown.
- Early invade threat
- Check lane prio and charged-Q angles near your camps.
- 1v1 threat
- Her shield and repeated-hit damage punish careless melee trades. Enter after a missed Q when safe.
- Scaling comparison
- Your carry threat needs resets; her R can stop your first entry at any stage.
- Important cooldown
- Q charge and Cease and Desist after six.
- Pathing note
- Cover exposed lanes as six approaches. Countergank with help instead of forcing an even duel.
- Teamfight note
- Stay behind allied engage. Do not present yourself as the free first R target.
- Possession value
- Q closes a gap and E supports follow-up damage. You do not borrow her targeted R.
- Rune / build adaptation
- Conqueror for sustained contact; HoB with reliable CC setup. Buy for the whole team’s physical burst.
Elise
High threat
- Difficulty
- Red early: Cocoon into burst can end the fight before your reset.
- Early invade threat
- High with moving lanes. Cover entrances and preserve HP on your first clear.
- 1v1 threat
- Do not eat Cocoon on an exposed camp. A miss creates a punish window, not a guaranteed win.
- Scaling comparison
- You can carry later reset fights; her pick threat never disappears.
- Important cooldown
- Human E Cocoon and spider E Rappel.
- Pathing note
- Track early ganks and possible dives. Trade safely across the map when lanes cannot help.
- Teamfight note
- Let allied front line take the opening. Hold damage if she uses Rappel to leave targeting.
- Possession value
- Use the basic tools in the form you receive. Do not assume both forms are available when Heartbreaker replaces R.
- Rune / build adaptation
- HoB rewards a caught Elise; Conqueror suits the broader fight. Buy needed MR rather than pure damage into repeated AP picks.
Rengar
High threat
- Difficulty
- Red around brush and fog; deny repeated leap access.
- Early invade threat
- High when he can use nearby brush and lane prio. Ward the approach, not just the camp.
- 1v1 threat
- Track Ferocity and avoid repeated brush leaps. Do not dump damage before his defensive response.
- Scaling comparison
- His burst threatens your entry; grouped CC gives you a better reset fight than a solo chase.
- Important cooldown
- Empowered ability choice, W response and R hunt after six.
- Pathing note
- Take a covered route between camps. Do not facecheck brush to contest one last camp.
- Teamfight note
- Stay near peel, track his flank and punish the commitment with your team.
- Possession value
- Q, W and E can help the next target. Brush changes his access; you do not gain Thrill of the Hunt.
- Rune / build adaptation
- Shieldbow or justified armor can preserve the first reset. HoB needs a caught target; Conqueror needs safe contact.
Rek’Sai
High threat
- Difficulty
- Red early: tunnel angles and knockup punish unsupported camps.
- Early invade threat
- High with prio. Cover unusual tunnel entrances as well as the obvious river path.
- 1v1 threat
- Respect her unburrow setup and follow-up. Look for spent control and allied damage.
- Scaling comparison
- You can win a later reset fight, but her catch still removes a careless carry.
- Important cooldown
- Unburrow knockup, tunnel access and Void Rush after six.
- Pathing note
- Track early gank lanes; use warded routes and trade camps when your side cannot move.
- Teamfight note
- Do not walk into her alone to start the fight. Follow allied CC from a protected position.
- Possession value
- Basic knockup and tunnel tools can help follow-up. You do not gain Void Rush.
- Rune / build adaptation
- Conqueror for protected extended contact; HoB for a caught target. Defense should answer her full team, not only the jungle duel.
Udyr
Respect the matchup
- Difficulty
- Yellow: his stance choice and build change the fight.
- Early invade threat
- Watch fast camp pressure with lane prio. Do not turn every stolen camp into a losing chase.
- 1v1 threat
- Respect his stun, sustain and awakened stance. Trade after the relevant tools are spent.
- Scaling comparison
- Tank and damage builds demand different answers. Your resets need contact without being run down.
- Important cooldown
- E stun and the awakened stance he has available.
- Pathing note
- Keep clear tempo and track his shown side. Contest with help or take the opposite camps.
- Teamfight note
- Do not chase through his team’s zone. Focus the first target your team can actually finish.
- Possession value
- Basic Q, W and E tools offer damage, defense and a stun. Do not plan around the enemy R stance.
- Rune / build adaptation
- Conqueror with sustained uptime; pen for actual armor and MR for meaningful magic damage. A tank label alone does not choose the build.
Bel’Veth
High threat
- Difficulty
- Red in uncontrolled duels; punish spent dashes and E.
- Early invade threat
- Respect early camp fights with moving lanes. Protect entrances and do not contest alone.
- 1v1 threat
- Track her directional Qs and E defensive channel. Do not spend the whole combo into damage reduction.
- Scaling comparison
- Uninterrupted attacks and farm stacks are a real threat. Your answer is CC, access and the first reset.
- Important cooldown
- Q directions, W knockup and E channel.
- Pathing note
- Match camp tempo and plan Void-objective contests with prio. Give a bad contest before it becomes kills and more map pressure.
- Teamfight note
- Use allied CC to stop free attacks. Hit a reachable reset target instead of chasing every dash.
- Possession value
- Q mobility and W knockup help chain a fight. You do not gain her R transformation.
- Rune / build adaptation
- Conqueror for team-backed uptime; HoB for a clean catch. Armor and needed pen beat assuming another burst item wins a long duel.
Matchup colors are ZeusRa’s practical threat assessments. Use ranked statistics as context, not a promise about your next game.
Solve the next obstacle.
| Enemy pattern | Rune lean | Item and entry adjustment |
|---|---|---|
| Multiple tanks | Conqueror when you can maintain contact | Repeated-hit damage, armor penetration after armor appears, and enough durability to keep attacking. Keep their carry damage in mind. |
| Multiple squishy targets | HoB when they are reachable | Burst, crit, or lethality can shorten the first-reset window. More damage alone will not get you through reliable peel. |
| Assassins | Either, for the fight you can survive | Answer physical or magic burst with appropriate defense. Keep allied help close and avoid isolated entrances. |
| Heavy crowd control | A controlled second entry matters most | Buy appropriate tenacity and durability, then wait for key disables. Tenacity does not shorten every form of control. |
| Heavy disengage | HoB for short catch; Conqueror for maintained contact | Use useful fog and allied CC. Save mobility for follow-up instead of chasing the first retreat tool. |
| Low-mobility carries | HoB can exploit reliable catch | Damage matters when the carry really cannot escape. Their support’s peel still matters. |
| AD-heavy enemies | Choose by fight length | Steelcaps, armor, or Death’s Dance when their damage profile warrants it. Retain enough damage to finish the target. |
| AP-heavy enemies | Choose by fight length | Mercury’s Treads and a suitable MR item. Distinguish repeated magic damage from burst. |
The jungler shapes your opening. All five enemies shape your build.
Patch notes & review method.
Verified change log
- 26.19: reviewed; no direct Viego champion change in Riot’s Summoner’s Rift notes.
- 26.18: AD growth 3.5 → 4. Possession healing scales with bonus AD, AP, bonus attack speed and bonus HP. Riot called out bruiser viability.
Ranked evidence
Ranked observations show viable HoB and Conqueror paths. Matchups, player skill and build-selection bias matter; frequency does not mean best.
No permanent win-rate claims. Build priorities reflect ZeusRa’s approach, checked against the current kit.
Patch 26.19 · guide reviewed September 29, 2026 · build and mechanics update October 9, 2026.
- Riot · patch 26.18
- Riot · patch 26.19
- Riot · Data Dragon 16.19.1
- CommunityDragon · patch 16.19 game data
- High-ranked build observations
ZeusRa Guides is not endorsed by Riot Games and does not reflect the views or opinions of Riot Games or anyone officially involved in producing or managing Riot Games properties. Riot Games and all associated properties are trademarks or registered trademarks of Riot Games, Inc.